Installing BanyanDB Cluster Mode
A BanyanDB cluster consists of at least one data node (stores time-series data and hosts the property-based schema registry) and at least one liaison node (stateless gateway that routes writes and queries). Both node types run as independent processes of the same banyand binary.
The schema registry is hosted by the data nodes themselves and synchronized between peers via an internal property-based protocol. Every node must therefore be able to locate its peers before it can join the cluster — so node discovery has to be configured first, otherwise liaison nodes will not find data nodes and additional data nodes will not find the existing schema registry to sync from.
The recommended order is therefore:
- Decide on a node-discovery mode and prepare the SRV records or static nodes file.
- Obtain the
banyandbinary on every node. - Start the data nodes (each one exposes its gRPC endpoint and the property schema server).
- Start the liaison nodes, pointing them at the same discovery source.
1. Configure Node Discovery
BanyanDB supports three node-discovery modes: none (default, standalone only), dns (DNS SRV based, cloud-native), and file (static YAML file). For cluster deployments you must pick either dns or file. A full reference of all discovery-related flags, TLS settings, retry/backoff tuning, and operational behavior lives in the node discovery documentation; this guide only shows the minimum needed to bring up a cluster.
Decide Which Mode to Use
filemode: simplest choice for bare-metal, VM, Docker Compose, development environments, or any setup with a small and relatively static list of nodes. Node membership is declared in a YAML file and reloaded periodically.dnsmode: recommended for Kubernetes (especially StatefulSets behind a headless service) and any environment that already publishes DNS SRV records for the cluster. No external coordination service is required — the cluster relies on the DNS infrastructure that already exists.nonemode: only used in standalone mode; not a valid choice for clusters.
The same discovery configuration must be supplied to every data node and every liaison node in the cluster.
File Mode: Prepare a nodes.yaml
Create a file reachable by every process that will participate in the cluster (e.g. /etc/banyandb/nodes.yaml). List every data node and every liaison node — each entry needs a unique name and the gRPC endpoint:
nodes:
  - name: data-0
    grpc_address: 192.168.1.20:17912
  - name: data-1
    grpc_address: 192.168.1.21:17912
  - name: liaison-0
    grpc_address: 192.168.1.10:17912
The file is reread at the --node-discovery-file-fetch-interval cadence (default 5m), so adding or removing a node after startup only requires editing the file on each host; failed nodes are retried with exponential backoff. TLS fields (tls_enabled, ca_cert_path) can be added per entry — see the node discovery documentation for the full schema.
DNS Mode: Publish SRV Records
In Kubernetes, create a headless service (clusterIP: None) selecting your data and liaison pods; Kubernetes will automatically publish SRV records of the form _<port-name>._<proto>.<service>.<namespace>.svc.cluster.local. In non-Kubernetes environments, configure your DNS server with equivalent SRV records pointing to each node’s gRPC endpoint.
An example headless service for the data tier:
apiVersion: v1
kind: Service
metadata:
  name: banyandb-data
  namespace: default
spec:
  clusterIP: None
  selector:
    app: banyandb
    component: data
  ports:
    - name: grpc
      port: 17912
      protocol: TCP
      targetPort: grpc
This produces the SRV record _grpc._tcp.banyandb-data.default.svc.cluster.local, which is what you will pass to --node-discovery-dns-srv-addresses. For multi-zone topologies, mTLS, CoreDNS TTL tuning, and fallback behavior, see the node discovery documentation.
2. Obtain the Binary
On every host (or in the container image) that will run a BanyanDB process:
- Download or build the BanyanDB release.
- Unpack
skywalking-banyandb-x.x.x-bin.tgz. - Select the binary for your platform, for example
banyand-linux-amd64orbanyand-darwin-amd64. - Move it onto
PATH, for examplemv banyand-linux-amd64 /usr/local/bin/banyand.
The following examples assume banyand is available in /usr/local/bin.
3. Start the Data Nodes
Every data node runs as banyand data, with its gRPC service plus the property-based schema server. Start them before the liaison nodes so that when liaison nodes come up, the schema registry is already reachable.
File mode example:
banyand data \
  --node-discovery-mode=file \
  --node-discovery-file-path=/etc/banyandb/nodes.yaml
DNS mode example:
banyand data \
  --node-discovery-mode=dns \
  --node-discovery-dns-srv-addresses=_grpc._tcp.banyandb-data.default.svc.cluster.local
Repeat on each physical or virtual data node. Additional data nodes joining an already-running cluster will locate the existing schema server through the same discovery source and sync the schema from it automatically.
4. Start the Liaison Nodes
Liaison nodes are stateless and use the same discovery source to locate data nodes; there is no separate configuration to point them at “the” schema registry.
File mode example:
banyand liaison \
  --node-discovery-mode=file \
  --node-discovery-file-path=/etc/banyandb/nodes.yaml
DNS mode example:
banyand liaison \
  --node-discovery-mode=dns \
  --node-discovery-dns-srv-addresses=_grpc._tcp.banyandb-data.default.svc.cluster.local
A minimal cluster ends up as a small set of these processes:
banyand data    <flags>   # on each data host
banyand data    <flags>   # ...
banyand liaison <flags>   # on each liaison host
Node Host Registration
Every node advertises itself to the rest of the cluster using a host part that is resolved according to --node-host-provider:
node-host-provider=hostname(default): the OS hostname is used.node-host-provider=ip: the first non-loopback IPv4 address is used.node-host-provider=flag: the value of--node-hostis used.
Pick the option that matches how other nodes in the cluster can reach this process. In container environments where hostnames are not routable, ip or an explicit flag value is usually safer than the default.
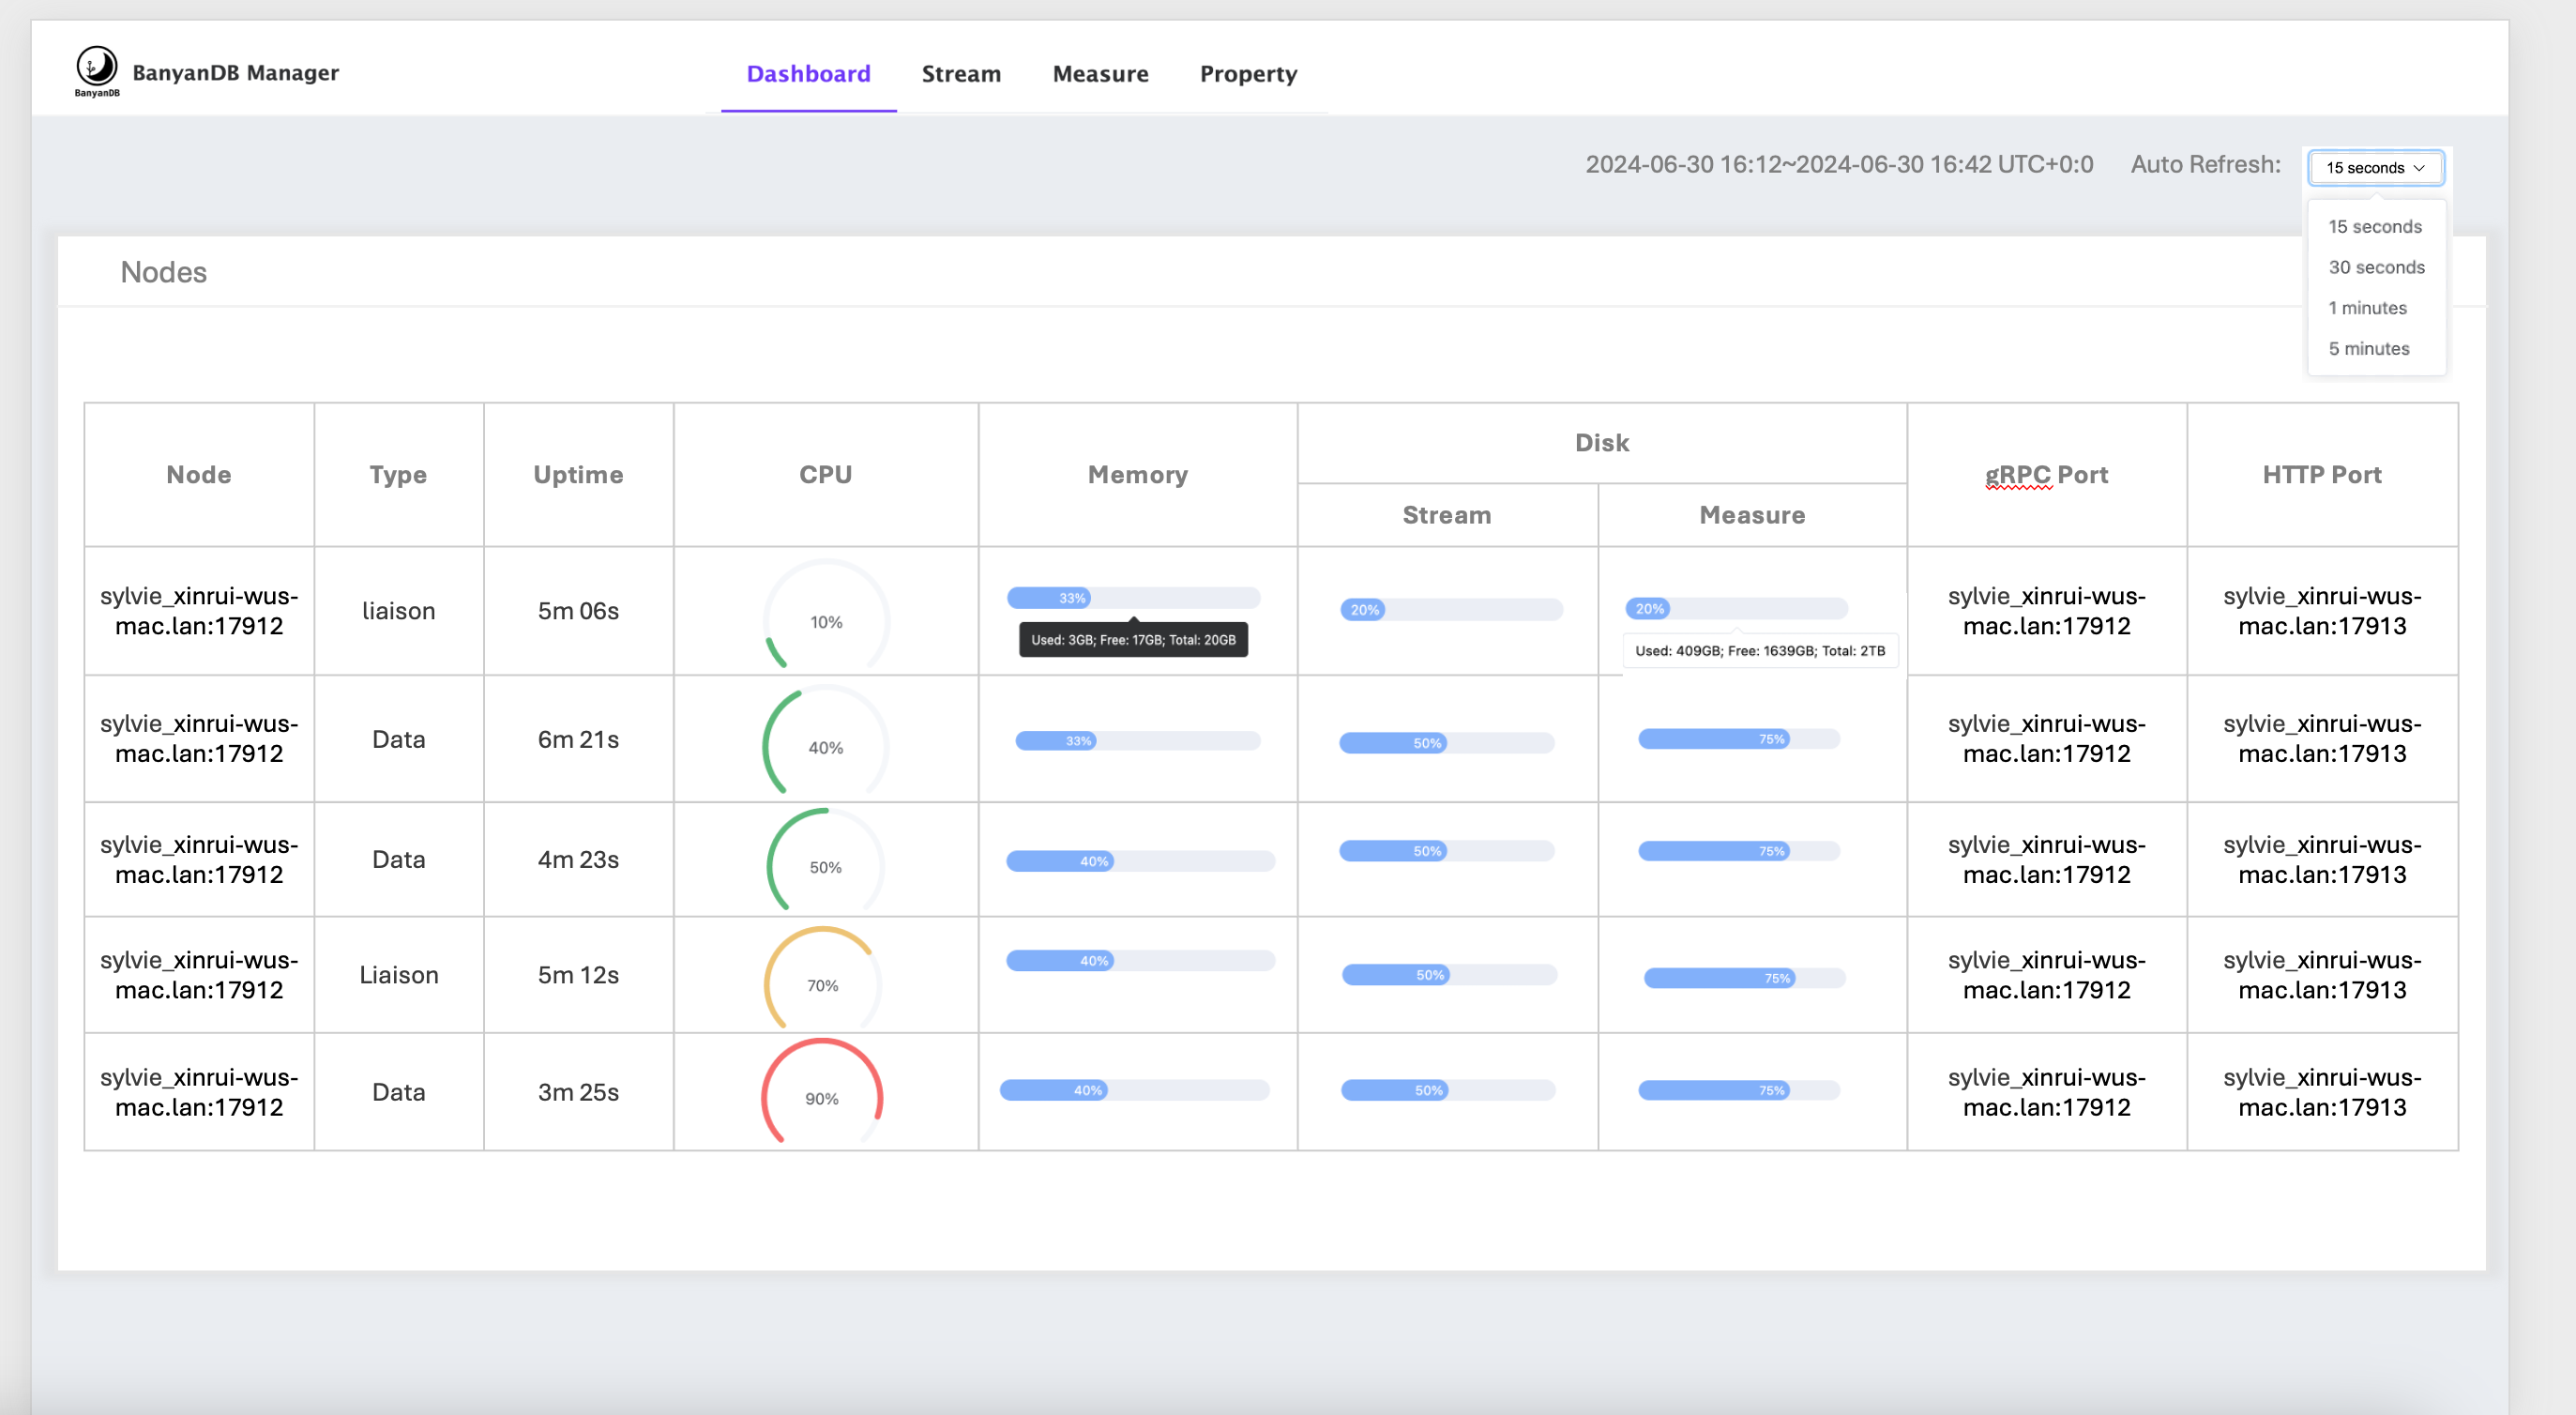
Self-observability dashboard
If self-observability mode is on, there will be a dashboard in banyandb-ui to monitor the nodes status in the cluster.