Getting Started
This document introduces how to create a kubernetes cluster locally using kind and how to deploy the basic skywalking components to the cluster.
Prerequisites
Step1: Create a kubernetes cluster locally using kind
Note: If you have a kubernetes cluster (> v1.21.10) already, you can skip this step.
Here we create a kubernetes cluster with 1 control-plane node and 1 worker nodes.
$ cat <<EOF | kind create cluster --config=-
kind: Cluster
apiVersion: kind.x-k8s.io/v1alpha4
nodes:
- role: control-plane
  image: kindest/node:v1.21.10
- role: worker
  image: kindest/node:v1.21.10
EOF
Expected output
Creating cluster "kind" ...
 ✓ Ensuring node image (kindest/node:v1.21.10) 🖼
 ✓ Preparing nodes 📦 📦
 ✓ Writing configuration 📜
 ✓ Starting control-plane 🕹️
 ✓ Installing CNI 🔌
 ✓ Installing StorageClass 💾
 ✓ Joining worker nodes 🚜
Set kubectl context to "kind-kind"
You can now use your cluster with:

kubectl cluster-info --context kind-kind

Not sure what to do next? 😅  Check out https://kind.sigs.k8s.io/docs/user/quick-start/
Check all pods in the cluster.
$ kubectl get pods -A
Expected output
NAMESPACE            NAME                                         READY   STATUS    RESTARTS   AGE
kube-system          coredns-558bd4d5db-h5gxt                     1/1     Running   0          106s
kube-system          coredns-558bd4d5db-lhnvz                     1/1     Running   0          106s
kube-system          etcd-kind-control-plane                      1/1     Running   0          116s
kube-system          kindnet-fxlkm                                1/1     Running   0          106s
kube-system          kindnet-vmcvl                                1/1     Running   0          91s
kube-system          kube-apiserver-kind-control-plane            1/1     Running   0          116s
kube-system          kube-controller-manager-kind-control-plane   1/1     Running   0          116s
kube-system          kube-proxy-nr4f4                             1/1     Running   0          91s
kube-system          kube-proxy-zl4h2                             1/1     Running   0          106s
kube-system          kube-scheduler-kind-control-plane            1/1     Running   0          116s
local-path-storage   local-path-provisioner-74567d47b4-kmtjh      1/1     Running   0          106s
Step2: Build the operator image
Check into the root directory of SWCK and build the operator image as follows.
$ cd operator
# Build the operator image
$ make docker-build
You will get the operator image controller:latest as follows.
$ docker images
REPOSITORY     TAG        IMAGE ID       CREATED          SIZE
controller     latest     84da7509092a   22 seconds ago   53.6MB
Load the operator image into the kind cluster or push the image to a registry that your kubernetes cluster can access.
$ kind load docker-image controller
or
$ docker push $(YOUR_REGISTRY)/controller
Step3: Deploy operator on the kubernetes cluster
Install the CRDs as follows.
$ make install
Check the CRDs are installed successfully.
Expected output
kubectl get crd | grep skywalking
banyandbs.operator.skywalking.apache.org                 2023-11-05T03:30:43Z
fetchers.operator.skywalking.apache.org                  2023-11-05T03:30:43Z
javaagents.operator.skywalking.apache.org                2023-11-05T03:30:43Z
oapserverconfigs.operator.skywalking.apache.org          2023-11-05T03:30:43Z
oapserverdynamicconfigs.operator.skywalking.apache.org   2023-11-05T03:30:43Z
oapservers.operator.skywalking.apache.org                2023-11-05T03:30:43Z
satellites.operator.skywalking.apache.org                2023-11-05T03:30:43Z
storages.operator.skywalking.apache.org                  2023-11-05T03:30:43Z
swagents.operator.skywalking.apache.org                  2023-11-05T03:30:43Z
uis.operator.skywalking.apache.org                       2023-11-05T03:30:43Z
Deploy the SWCK operator to the cluster.
$ make deploy
Or deploy the SWCK operator to the cluster with your own image.
$ make deploy OPERATOR_IMG=$(YOUR_REGISTRY)/controller
Get the status of the SWCK operator pod.
$ kubectl get pod -n skywalking-swck-system
NAME                                                 READY   STATUS    RESTARTS   AGE
skywalking-swck-controller-manager-5f5bbd4fd-9wdw6   2/2     Running   0          34s
Step4: Deploy skywalking componentes on the kubernetes cluster
Create the skywalking-system namespace.
$ kubectl create namespace skywalking-system
Deploy the skywalking components to the cluster.
$ cat <<EOF | kubectl apply -f -
apiVersion: operator.skywalking.apache.org/v1alpha1
kind: OAPServer
metadata:
  name: skywalking-system
  namespace: skywalking-system
spec:
  version: 9.5.0
  instances: 1
  image: apache/skywalking-oap-server:9.5.0
  service:
    template:
      type: ClusterIP
---
apiVersion: operator.skywalking.apache.org/v1alpha1
kind: UI
metadata:
  name: skywalking-system
  namespace: skywalking-system
spec:
  version: 9.5.0
  instances: 1
  image: apache/skywalking-ui:9.5.0
  OAPServerAddress: http://skywalking-system-oap.skywalking-system:12800
  service:
    template:
      type: ClusterIP
    ingress:
      host: demo.ui.skywalking
EOF
Check the status of the skywalking components.
$ kubectl get pod -n skywalking-system
NAME                                     READY   STATUS    RESTARTS   AGE
skywalking-system-oap-68bd877f57-fhzdz   1/1     Running   0          6m23s
skywalking-system-ui-6db8579b47-rphtl    1/1     Running   0          6m23s
Step5: Use the java agent injector to inject the java agent into the application pod
Label the namespace where the application pod is located with swck-injection=enabled.
$ kubectl label namespace skywalking-system swck-injection=enabled
Create the application pod.
Note: The application pod must be labeled with
swck-java-agent-injected=trueand theagent.skywalking.apache.org/collector.backend_serviceannotation must be set to the address of the OAP server. For more configurations, please refer to the guide.
$ cat <<EOF | kubectl apply -f -
apiVersion: apps/v1
kind: Deployment
metadata:
  name: demo
  namespace: skywalking-system
spec:
  selector:
    matchLabels:
      app: demo
  template:
    metadata:
      labels:
        # enable the java agent injector
        swck-java-agent-injected: "true"
        app: demo
      annotations:
        agent.skywalking.apache.org/collector.backend_service: "skywalking-system-oap.skywalking-system:11800"
    spec:
      containers:
      - name: demo1
        imagePullPolicy: IfNotPresent
        image: ghcr.io/apache/skywalking-swck-spring-demo:v0.0.1
        command: ["java"]
        args: ["-jar","/app.jar"]
        ports:
          - containerPort: 8085
        readinessProbe:
          httpGet:
            path: /hello
            port: 8085
          initialDelaySeconds: 3
          periodSeconds: 3
          failureThreshold: 10
---
apiVersion: v1
kind: Service
metadata:
  name: demo
  namespace: skywalking-system
spec:
  type: ClusterIP
  ports:
  - name: 8085-tcp
    port: 8085
    protocol: TCP
    targetPort: 8085
  selector:
    app: demo
EOF
Check the status of the application pod and make sure the java agent is injected into the application pod.
$ kubectl get pod -n skywalking-system -l app=demo -ojsonpath='{.items[0].spec.initContainers[0]}'
Expected output
{"args":["-c","mkdir -p /sky/agent \u0026\u0026 cp -r /skywalking/agent/* /sky/agent"],"command":["sh"],"image":"apache/skywalking-java-agent:8.16.0-java8","imagePullPolicy":"IfNotPresent","name":"inject-skywalking-agent","resources":{},"terminationMessagePath":"/dev/termination-log","terminationMessagePolicy":"File","volumeMounts":[{"mountPath":"/sky/agent","name":"sky-agent"},{"mountPath":"/var/run/secrets/kubernetes.io/serviceaccount","name":"kube-api-access-4qk26","readOnly":true}]}
Also, you could check the final java agent configurations with the following command.
$ kubectl get javaagent -n skywalking-system -l app=demo -oyaml
Expected output
apiVersion: v1
items:
- apiVersion: operator.skywalking.apache.org/v1alpha1
  kind: JavaAgent
  metadata:
    creationTimestamp: "2023-11-19T05:34:03Z"
    generation: 1
    labels:
      app: demo
    name: app-demo-javaagent
    namespace: skywalking-system
    ownerReferences:
    - apiVersion: apps/v1
      blockOwnerDeletion: true
      controller: true
      kind: ReplicaSet
      name: demo-75d8d995cc
      uid: 8cb64abc-9b50-4f67-9304-2e09de476168
    resourceVersion: "21515"
    uid: 6cbafb3d-9f43-4448-95e8-bda1f7c72bc3
  spec:
    agentConfiguration:
      collector.backend_service: skywalking-system-oap.skywalking-system:11800
      optional-plugin: webflux|cloud-gateway-2.1.x
    backendService: skywalking-system-oap.skywalking-system:11800
    podSelector: app=demo
    serviceName: Your_ApplicationName
  status:
    creationTime: "2023-11-19T05:34:03Z"
    expectedInjectiedNum: 1
    lastUpdateTime: "2023-11-19T05:34:46Z"
    realInjectedNum: 1
kind: List
metadata:
  resourceVersion: ""
  selfLink: ""
If you want to check the logs of the java agent, you can run the following command.
$ kubectl logs -f -n skywalking-system -l app=demo -c inject-skywalking-agent
Step6: Check the application metrics in the skywalking UI
First, port-forward the demo service to your local machine.
$ kubectl port-forward svc/demo 8085:8085 -n skywalking-system
Then, trigger the application to generate some metrics.
$ for i in {1..10}; do curl http://127.0.0.1:8085/hello && echo ""; done
After that, you can port-forward the skywalking UI to your local machine.
$ kubectl port-forward svc/skywalking-system-ui 8080:80 -n skywalking-system
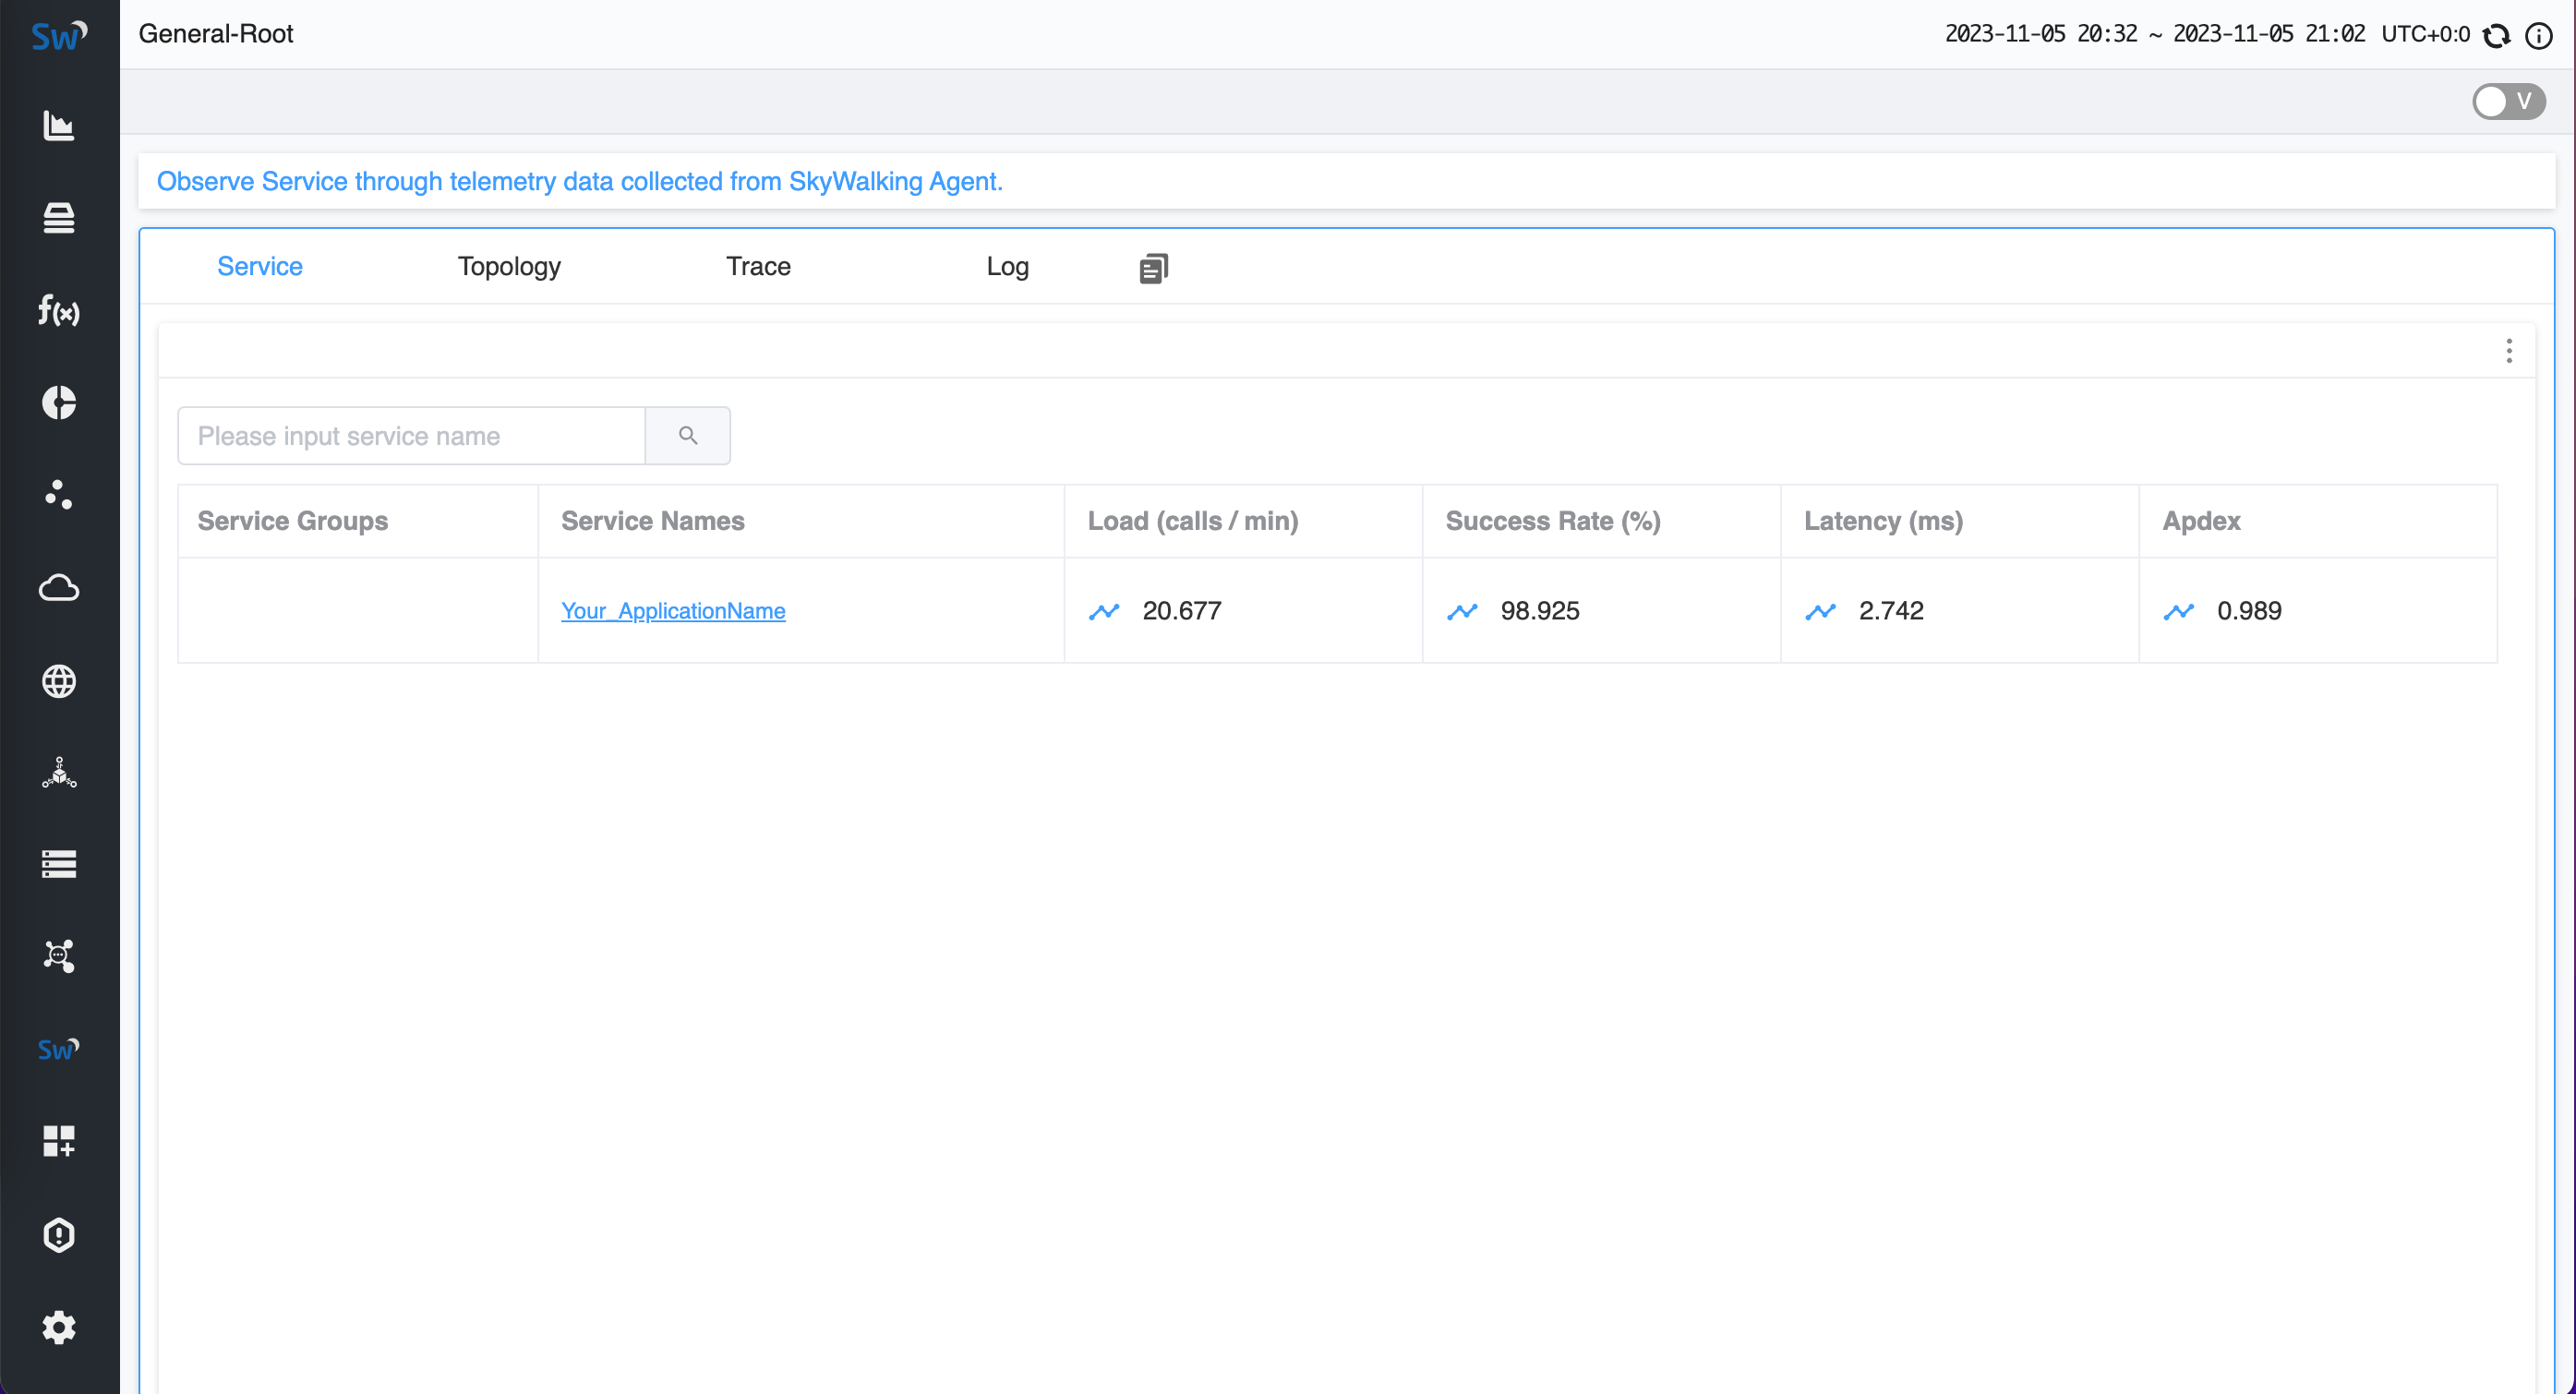
Open the skywalking UI in your browser and navigate to http://127.0.0.1:8080 to check the application metrics.
Expected output
Also, if you want to expose the external metrics to the kubernetes HPA, you can follow the guide to deploy the custom metrics adapter and you may get some inspiration from the e2e test.